Here at Sparksmith, we are always working to find new ways to add value to you, the customer. The following is a transcript of the video embedded below
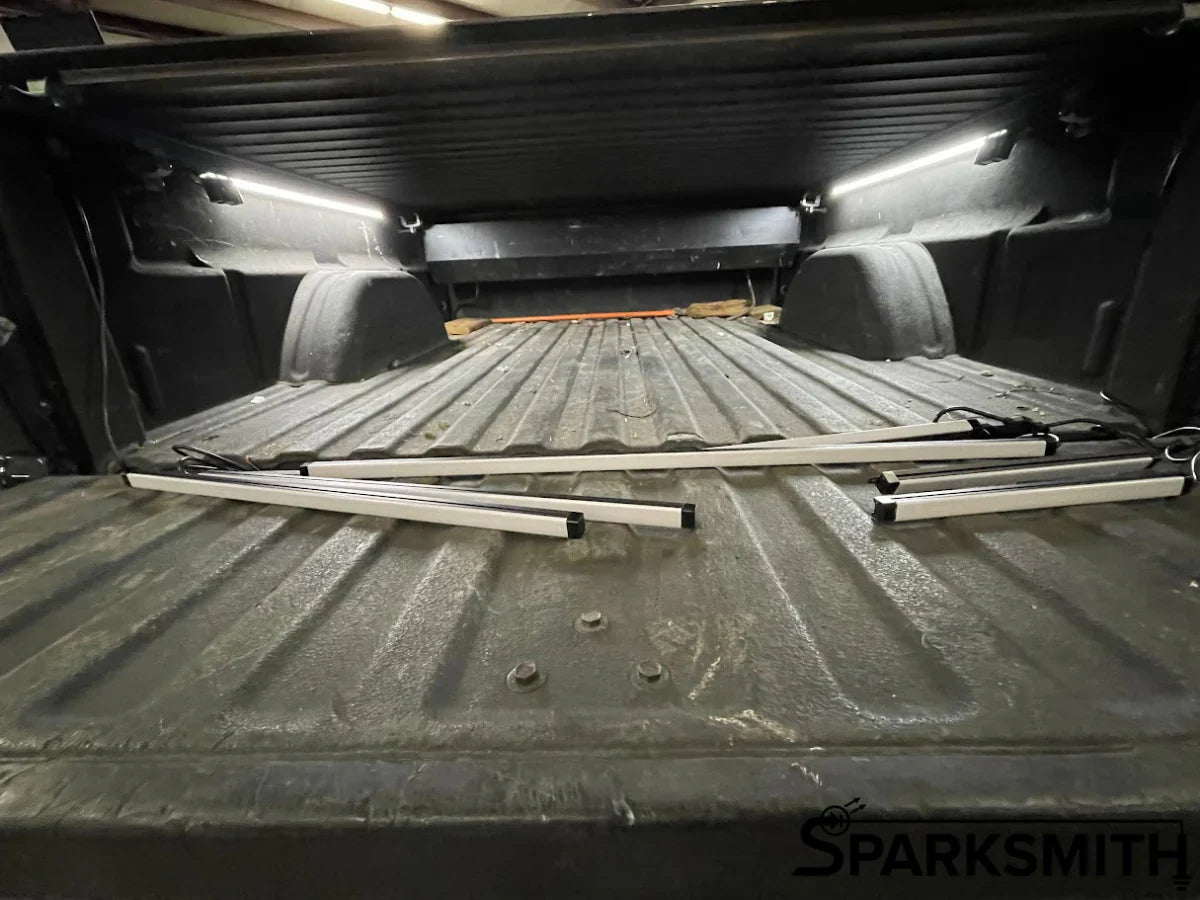
(0:00) Hey everybody, this is Brandon from Sparksmith helping you see and be seen. Today I wanted to (0:04) go over our new truck bed light kit. It is a universal kit that comes in three sizes, (0:09) one foot, two foot, and three foot long.
They're sold as a pair. I have the three foot version here. (0:16) They will come with magnets pre-mounted on each end that are strong enough to hold these guys in (0:22) place.
Each one will plug into the harness that we make here in-house. This harness will plug in (0:29) to one side and go down across. The other side will come down and join it and then you'll run (0:34) the remainder of the wire up along your frame rail.
And then you've got just a simple two-wire (0:41) connection that will connect to your choice of power source. Now these bars, the longest ones, (0:48) the three foot long ones, on their maximum brightness consume about two amps of power, (0:54) which is not a whole lot of power. So most circuits on most vehicles will be able to (0:59) handle that.
So if you're connecting them to like your third brake light, the cargo light, (1:05) or say your interior lights, or even just a basic on-off switch, (1:10) most of those things should be able to handle these with no issues. And we can certainly send (1:15) you instructions for your specific application. We'll have some application-specific instructions (1:22) in the listing and we'll have additional information available on our website, (1:28) as well as you can always email support at sparksmith.com if you have questions about (1:32) your specific application.
So installation of this is going to be really, really simple. (1:37) Like I said, where there's magnets on the lights. For now, I'm going to come up with just a (1:43) zip-tie solution, honestly, for these controllers.
And then we're going to eventually come up with (1:50) some kind of bracket to actually mount these, something that looks a little more neat and (1:54) clean. And then the harness will just run, like I said, from one side to the other, (1:58) and then up along the frame rail and up to your chosen power supply. (2:04) So one thing I wanted to show you real quick was on these controllers that come with the (2:14) lights.
Now don't do this. I'm just doing this to show you what is inside here. If you get curious, (2:20) these are a completely potted controller, fully sealed from the elements, (2:25) and completely waterproof.
So no need for you to look around here and get nosy about it. It's just (2:31) some gray material, two little buttons inside it, but completely potted controller with controls (2:38) for both the yellow function and the white function. And I'll go over the function of (2:42) those once I get these things installed, but I'll do a quick little time-lapse video showing (2:46) how they get installed.
It's really simple. So I've got the wires run. You want to just follow (3:16) the frame rail and keep it alongside your factory wiring and just kind of zip tie it.
(3:25) This one's just a demo so I didn't get every little detail right, but you want to follow (3:31) the frame rail and follow your factory wire loom. Zip tie it into place several times just to make (3:36) sure it stays away from anything that moves and anything that gets hot. Once you follow the frame (3:41) rail, if you come up here, right here there's this plastic thing.
Most trucks have, this is just like (3:51) a vent, most trucks have these somewhere. And it's just, we'll open up the cabin, go inside in just a (4:01) minute and see, but it is actually a perfect place where you can pass through a set of wires. (4:08) And then we'll go in and fold the seat down.
I'll show you what we're talking about. (4:12) So we can pull those through and get them. I'm going to wire them to the cargo light.
(4:17) Now if your truck doesn't have those, yeah come here. So you can also find a body plug like that (4:26) that goes up into the floorboard and you can run the wires through there. Usually most trucks will (4:32) have several of those kicking around somewhere underneath here, but that's another good place to (4:38) get access to inside the cab.
(4:44) So I'll have to fish them through, but basically the vent that's down in there (4:54) comes through right in here. And so we've got to get into that. I'll have to find out where it is, (5:01) but we'll get them passed through there and then we're going to run them up (5:07) and just kind of tuck them in behind the pillar trim and then we'll pull down this panel and we (5:13) get access to the cargo light back there.
It's on time lapse, right? Oh no. (5:29) Okay, once you get your wire run up and across the headliner, you pull it out. There'll be some (5:34) kind of opening similar to that.
Just pull these two wires through and this is an 07 Silverado (5:42) Classic and the cargo light is powered by this white wire on this aftermarket assembly, (5:47) but it comes from this little red wire right here. But rather than chew into the factory wiring, (5:56) I'm going to crimp onto this wire here and then I'm going to run a self-drilling screw (6:03) into here for the ground and that will literally be all there is. So a lot of you may know I don't (6:09) like using these quick crimps, but they do have their place in time.
Given that it's such a small (6:16) power load and it's in a dry space, like if these wires are getting wet, you have bigger problems. (6:23) But when I say fill them with grease, this is kind of what I mean. It's like the thing is (6:27) absolutely filled with grease.
Then crimp it to the wire and then plug your tap in. (6:33) Okay, so I relearned something that I kind of already knew and just basically forgot about (6:39) was that these trucks, long story short, they are a ground side switch for the cargo lights, (6:46) meaning that it always has power. So as soon as I grounded this, these came on.
But if I (6:55) take the ground away, the light goes off. So it always has power and it switches the ground, (7:01) which means that I have to change out this little connector for another quick crimp like this guy (7:12) to the ground wire. I hope that that does the trick.
We will find out. They are two separate (7:19) ground wire circuits, so I have a high degree of confidence that this will be successful. (7:26) There, now for a quick and easy install.
Those are both crimped. I can put this back in place (7:34) and then we'll, well before I screw this back in, I'm just going to kind of set it there (7:40) and we're going to see what happens. I'm going to go turn on my cargo light and let's see what happens.
(7:59) Fiddlesticks. So I forgot. A while back I rewired my cargo light switch (8:11) so that it provided a ground for wheel rings (8:17) instead of the cargo light.
So I can't make the cargo light work anymore until I take some stuff (8:25) apart in there. So I'm going to do some video magic and I'll be back in like half a second (8:30) with a working cargo light and we'll just pretend that this part never happened. (8:44) Okay, we're all fixed.
Everything's fine. This is all fine. (8:49) I'll give you an idea of how much light these guys, keep in mind these are the 36 inch bars.
(8:54) But yeah, look at that. I've got light in the bed of my truck just by running two wires up to (9:05) my third brake light essentially. Now the fun part about these is you can set them (9:12) if you wanted the yellow look for some reason or whatever.
You can have the yellowish-amber (9:22) super bright for your cargo bed. I'm quite pleased with that. Okay, we got the lights working.
(9:31) And take a look here. They do have three different brightness settings. (9:35) To change the brightness, you just pick the color that you want and push and hold.
(9:40) One brighter. There's the brightest. So you can see it's a pretty substantial difference between (9:47) the lowest and the brightest setting.
You can also turn them to amber. It has the brightness (9:55) settings as well. So if you wanted a separate color, sometimes there's advantages to the (10:01) amber color.
There's a few different reasons we have these. But whatever you set it to, (10:08) because they're both at the brightest setting now on white, whatever you set it to, (10:11) it will be at that setting when they turn back on next time. So there you go.
And remember, (10:17) they come in three different sizes, one foot, two foot, three foot, sold in a pair, (10:21) two-wire simple hookup to your cargo light or your interior lights, however you want to do it. (10:26) We're always happy to help guide you on that process. But there you go, (10:30) the Sparksmith Universal Pickup Bed Lights.