(0:05) Hey, this is Brandon from Sparksmith helping you see and be seen. Today we're going to (0:08) open up a set of our tow mirrors for the 03-07 Silverado and show you how to install them. So first (0:19) get them out of the box.
I still get excited about this and I know what's in the box. (0:30) It's like Christmas every time. (0:45) The right side, which is the passenger side mirror, should come like this.
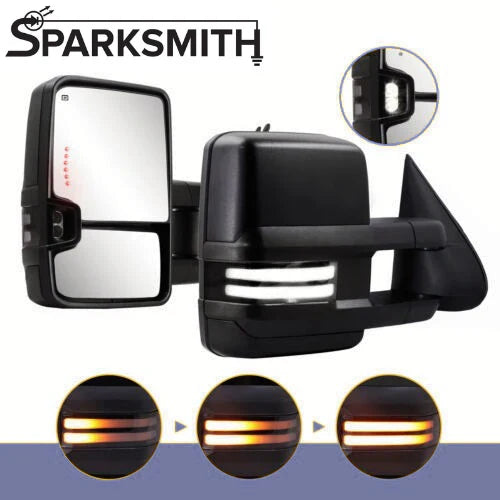
(0:54) They have a heater built in, they have a turn signal function, they have a reverse light function. (1:01) They do extend. I can show you that when I get them mounted on the truck, it's just easier.
(1:06) And they've got a switchback sequential turn signal function built into them. On the wiring, (1:12) this is the part we'll go over a little more depth. You've got two factory plugs.
This plug (1:17) has wires for the heaters. These three wires are for what moves the mirror up, down, left, right. (1:24) And then this wire is for your turn signal.
And this wire is just a ground. And those should plug (1:30) into your factory wiring. The manufacturers have gone and done what they like to do, which is take (1:34) something that works and change it.
So if you have the latest version of these tow mirrors with (1:41) let's say around 2025, some point they started changing this. For the better, there is no longer (1:48) a three wire connection for these mirrors. It is a two wire connection.
So the ground wire that was (1:55) in the old style is no longer needed. They've integrated it into the factory ground. So now (2:00) you've only got two wires, still the blue for the running light.
And now it's purple for the (2:07) reverse light. So instead of, was it a white wire for the reverse light, it is now a purple wire for (2:13) the reverse light. You get the same extension.
You're going to connect to the same circuits. (2:19) The blue wire goes to your choice of either key on power, just like I showed with the fuse taps, (2:26) or you can tap it into some kind of running light circuit underneath the dash wherever you would (2:31) like. The purple wire is the reverse light.
And this will go to that green wire that I explained (2:36) here in just a minute. That is the reverse function on the truck. So newest update, blue (2:43) wires still for running light, purple wires for reverse light, and there is no extra ground to add.
(2:50) Carry on. So we'll take this over to the truck. I'll show you how to remove the door panel, (2:56) bolt this on, and wire it up.
We'll go over how to remove the door panel. We've got that part (3:03) figured out. You just go ahead and skip this section and get to the wiring.
But you're going (3:06) to need some sort of panel popper, a 7mm socket, and a T20 Torx bit. First thing you'll do is (3:15) on the back edge of the door, be careful with this one because you're popping off a little (3:20) plastic cover. You don't want to get whatever you're prying with back behind this metal part (3:24) because you can mess it up.
So just be gentle about popping that off. On the front edge, (3:29) it is actually like those plastic rivet type things. (3:38) And you also have to pop off the slider for the door lock.
Then behind the lock, (3:49) there's a 7mm, that guy right there. Then there's another one tucked down here below the armrest. (4:09) You do want to remember the longer one goes behind that armrest and the shorter one goes (4:16) behind the door lock.
The last thing is to get that piece of trim off. And then (4:31) get this Torx bolt out. The whole thing should, you have to slide it up because it has plastic (4:41) hooks that go in and hook in down at the bottom here.
So don't just go yanking on the panel, (4:45) you're going to break stuff. You can pull this off. It should just slide right off like that.
(5:00) There is a screw down here on the bottom. You don't have to take that off. All that's doing (5:05) is holding this storage tray in place.
So you don't have to take that one off. If yours was (5:11) like mine, the light would probably just pop out by itself. Because these trucks are old and that's (5:16) what they do.
And then you just got to undo the electrical connectors here. Hard off, you've got (5:24) plugs left here. These two, you notice from when we looked at our mirrors, (5:30) it's got these same two, a black plug and a blue plug.
(5:35) The wiring is held onto the door. (5:44) Get your wiring out first before you unbolt the mirror. (5:55) It's just a 10 millimeter socket to get these three nuts off.
(6:08) Now the new mirrors come with new nuts to install them with, but if yours are in good shape, (6:14) I'd recommend using the factory ones just because they have a much bigger, sturdier washer to them. (6:27) So that's the old mirror out of the way. The new mirror, you got to reverse (6:52) stuff all your wiring through.
(7:08) Get this foam pad lined up. (7:14) You want to make sure that the wires pull all the way through and don't get pinched between the body (7:24) and mirror. (7:32) If you're doing this by yourself like I am, you want to start with (7:45) the top nut.
Get that top nut on there. That'll hold it on better than if you try to put the (7:48) bottom ones on first. You can see what comes with it are these tiny little things and these just (7:56) have, unless you throw it on the floor, a much better washer to them.
Okay, so next step. This (8:04) one has the Bose system, so I'm not sure if other sound systems or other trim levels have the same (8:10) thing, but to get the speaker out, this one just has a metal clip. You just like push down on the (8:17) metal clip and the speaker just folds out of the way.
You can kind of let that hang because your (8:25) next goal is going to be to take this bundle of wire, and this is the fun part, especially when (8:31) knowing you have to do it twice. You have to get these wires under the dash. The way to do that (8:45) properly is if you come over here and look, there's this rubber boot where the wires run through, (8:52) and it kind of takes this S-curve so that they don't get bound up from opening and closing (8:55) the door multiple times.
So you have to fish these wires through this rubber boot. (9:01) That part can be a pain in the butt, but basically you have to release the clip. (9:20) You can see it better here.
The one that hits the door, it's got these two retaining tabs. (9:31) One at the top and one at the bottom. You have to kind of squeeze those in, and then this piece (9:36) will pop out.
It's a similar story back here. I'll get this kick panel off, and we'll get this one (9:43) popped out, and that'll make it a whole lot easier to run these wires through here when you can kind (9:49) of manipulate this. Otherwise, you're just going to be fighting yourself.
If you're trying to run (9:52) like a metal rod or something through there, there's a really good chance you'll mess up or (9:57) damage some of the existing wiring, and then you've had a bad day. So let me get this part out. (10:03) So I got the body side thing off.
Come in here and take a look. It's just like the one that was (10:10) attached to the door where it's got these two retaining clips. I had to get, because I had to (10:17) come in through here, I just got a long screwdriver and used that to kind of pry down and pry up (10:23) to pop these little retaining clips loose, and then what I'm doing is trying to keep (10:32) this kind of straight up and down.
I'm going to take my wire. I have it taped to (10:40) a thin strip of metal and carefully run that up through this boot to get it inside. Once you've (10:46) done that, the rest of it's really simple.
It's just this part here can be kind of a pain in the (10:50) butt. Take your time with it. Go slow.
You don't want to damage these wires, but be patient with (10:54) it, and you can get this through here. Like I said, the goal is to get this boot as short and (11:00) straight as you can, and that will make it a lot easier. So as I said before, the blue is for your (11:09) white running light, white is for reverse power, and gray is for ground for that reverse light.
(11:16) You can get a ring terminal and crimp it on here. I was going to use, (11:20) you're just going to find some clean metal somewhere under the dash. There's several bolts (11:24) to choose from.
If you look under here, one of the two that was holding the OBD2 port on, (11:29) I pulled that nut off, and one thing you can do if you don't have any ring terminals (11:36) laying around is you can just strip a little extra length of wire (11:42) and just kind of wrap it around like that. And since it's in the truck and not outside the truck, (11:49) you don't have to worry about moisture and corrosion and dirt and all that stuff, (11:54) but just kind of wrapping the wire around like that. It's a little bit of a shade tree mechanic (11:57) thing, but you know, if you're in a pinch and you're out of ring terminals, the ring terminal (12:01) is the ideal way to do it, but if you want to do it that way, it's not going to hurt anything.
(12:04) So the next thing I was going to do is wire up the blue wire for the running lights. (12:11) There's a number of different ways you can do this. There's a couple of places under the dash (12:15) with either a dark brown or a dark brown with white stripe wire that most of those are going (12:22) to control like the parking lights.
So if you wanted to come up with the parking lights, (12:26) you can do that. What I'd like to do with mine, just one, it's easier, and two, I'd like it to (12:32) um, function this way. I want it to come on any time the key's on, so it acts like a true running (12:37) light.
One way to do that is right here in this fuse panel on the end of the dash, there's a 10 (12:44) amp fuse that says SEO accessory. There's another that says, another 10 amp says TBC accessory. (12:51) Both of these fuses only have power when the key's on.
So what you can do is this, (12:58) I'm going to use this one, SEO. You pull that fuse out. I'm going to start including these (13:05) fuse taps with the, um, the mirrors.
If you bought mirrors from us in the past and you didn't get (13:12) one of these, just email me and I'll send you one of mine. So put that 10 amp that you pulled (13:16) out in the bottom slot, then install the fuse tap back into that slot. And now this will have (13:25) power anytime the key's on.
So all you got to do is run the blue wire from each of your mirrors (13:31) over to this, and that white light will come on as soon as you turn the key on. (13:36) Okay, so this last one that we have to do is the reverse wire. If you recall, that's the (13:42) white wire, you know, the white wire coming from the mirror.
So underneath the dash and the (13:51) driver's footwell, you've got this junction box. There's like a plastic nut on here. You just spin (13:56) that off, pull the cover off, and you'll see that over here on the right hand side is this brown (14:07) plug.
And you're after, you can see I've already tapped into it with, uh, my backup camera system (14:16) that I've got on here, but the same concept applies. After this brown plug, in the top right (14:26) corner, there's a light green wire. That wire is the power for your reverse lights.
So you can do (14:35) basically what I've done here, which is to cut, strip, and crimp one of these red butt connectors, (14:43) and your white wire will come in, and you crimp it in there, crimp it on the other end, (14:48) hit it with a heat gun or a lighter or something like that, and that'll kind of seal it up and (14:52) make it a solid piece. And that's where you get your reverse power, is from this little brown plug (14:58) that's in this junction box that's in the driver's footwell. Okay, one thing I wanted to (15:03) touch on real quick while we're in here is if your truck didn't come equipped with turn signals (15:09) in the mirrors, there's a pretty easy solution for that.
You'll just extend the red and yellow, (15:16) or red and orange wire. You'll cut it off of that blue plug, and you'll extend it through (15:21) with your other three wires through this boot. You'll come over in this fuse panel (15:28) on the end of the dash.
There's two 10 amp fuses right here and right here. Those are for your left (15:35) and right turn signals. So you can get another one of these fuse taps like we had up here for (15:40) the running light, and use a fuse tap to get your turn signal power from right there, because those (15:45) fuses only have power as the turn signal is blinking.
So just an easy way to grab turn signal (15:53) power if it's not already in the door of the truck. Okay, we've got everything wired up. Now before (15:59) you put everything back together and bolt the door panel back on and all that, you want to test (16:02) everything so that you're not working against yourself if you have to go back and make some (16:07) adjustments.
So for mine, I'm going to turn the key on. You should get that white for the running (16:13) light, and you get the amber for the turn signal. And we've also got the red indicators here for (16:20) your turn signal, and last but not least, you get the reverse light function when you put it (16:27) in reverse.
Once you've tested all that out, (16:32) and then check your power mirror, make sure it goes up, down, left, right, all that, (16:39) you're good to go. Then from there, installation is the reverse of removing it, and so just (16:45) backtrack all your steps. Put everything back nice and neat like it was.
Make sure that all (16:49) the wires are away from anything that moves and anything that gets hot. And that should be it. (16:54) If you've got any questions about it or you need some more help, (16:56) email us at support at sparksmith.com. We're here to help.